After the entry event to launch the project, it’s time to start managing the workflow. And that’s where things can get a bit tricky.
Ready, set, evaluate!
In the initial phases of a project comes inquiry. That means research on the web, reading of information, and analysis of what was read. Early in my upper elementary school teaching career when students searched for information on the web, I assumed they knew how to find credible sources.
They don’t.
To avoid losing time during research as a result of students reading information from sites that aren’t reliable, teach them how to judge a website for veracity.
I show students how to use this Website Evaluation Checklist to scaffold their thinking. Because it’s a bit cumbersome, I first ask teams to fill one out when they find a website they think might offer helpful information for a project. This is a formative moment where I can meet with a team to review their thinking alongside the website. Ultimately, the goal is for students to internalize the questions contained in the checklist and slow down and interrogate a potential source of information.
Students do not have to fill one out for each site they use, but I will periodically ask teams or individual students to evaluate a website using the tool to monitor their thinking. I don’t give a grade for completing this, but I do provide feedback.
Also, ask students to summarize what they read and include a URL to the source they’re summarizing. If you read a summary and notice something that seems off, you’re once again formatively assessing student understanding. And with the URL, you can go back to the source with the student to figure out the misperception.
Where’s that information?
Ever had team work grind to a halt because a student with all the key research documents in their binder was absent? How about when a student prints out a document with great information but is missing the website URL so they can’t cite sources as they write?
Technology today can help sort out these snafus.
My students have started to use Google Slides to curate questions, links, and important information they find. At the outset of a PBL unit, we use the Question Formulation Technique (QFT) to generate need-to-know questions. Once those questions are formulated, they serve as the jumping-off-point for inquiry. By using this QFT Google Slide deck, we can place one question per slide in just one document that all students can easily access.
There are several benefits to using a tool like this: questions and resources to answer them are in one place and one document. A student who is absent does not derail data collection and could even work on the project at home when ill or traveling. By not using a sheet of paper, all students can open the document, see it, add to it, and play a role rather than huddling around a sheet of paper and assigning one person the task of “recorder.” And copy-pasting a URL is easy and allows students to click on a live link in a document rather than trying to type it into a browser.
Bring in ‘da noise, bring in ‘da assessment
While a project based unit starts with the end in mind, there have to be formative moments along the way to verify students are getting what you’re teaching. When I coach a staff after they’ve had an initial 3-day PBL 101 training, I like to take them through a product analysis module from BIE’s PBL 201 workshops that uses a tool called a “Project Flow Map.”
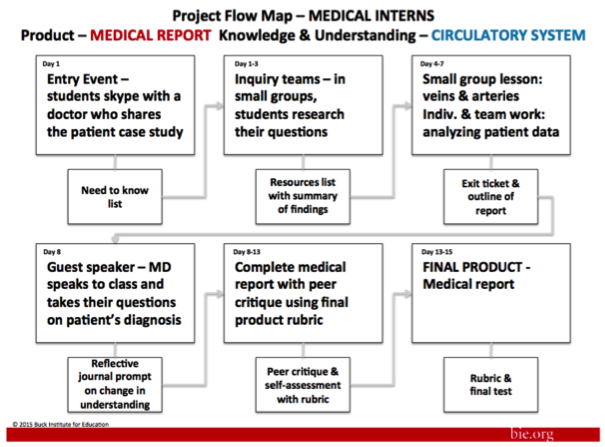
The image above shows the flow of a project. The final product is a medical report. Like an opera, in any PBL unit there are various “movements” that take place.
When researching, a list of questions or websites can become a formative assessment showing students can in fact generate high-quality questions and evaluate websites that might help answer them. To present what they’ve learned, teams of students might create an outline of a report to demonstrate areas where students have adequate information or places where they might need more information to develop and deepen their understanding of the topics being taught.
The project flow map is a way to get a feel for the elements that go into a project. It’s not a 40,000 foot overview, and it’s not a 200 foot close-up of the day-in-day-out lessons. If anything, it’s a tool to remind the teacher that evaluating an end product is not enough. Early in my career I was at times guilty of finishing teaching a unit only to realize a few students were missing essential elements of the learning. By then, it was too late.
Tie up loose ends
As I design project based learning units, I often find planning the entry event and the final product are things I feel comfortable with. But since each class is different, managing the middle can be a challenge. That’s when I go back to basics. What are the resources we have to answer the questions? How do we know they’re credible? Where is the information we need to complete the project? What do I want students to learn? How do I know if they learned it?
You most likely have tricks and tips of your own that you’ve used to manage projects in the past. I’d invite you to share them in the comments section below. If I’ve learned anything it’s this: there are always more tools out there to help manage the messy middle.
You can follow Jim Bentley and his students’ work on Twitter at @Curiosity_Films.